Have you ever dreamt of crafting homemade ice cream with a texture so velvety smooth it rivals your favorite scoop shop? The secret to that luxurious, dense consistency often lies in a technique many home cooks find intimidating: tempering eggs. While it might sound like a high-level culinary maneuver, mastering tempering is a foundational skill that unlocks the full potential of custard-based ice creams, transforming them from good to truly extraordinary.
As an ice cream enthusiast with over a decade of hands-on experience, I’ve seen countless batches come to life, from humble home machines to professional churners. The difference a perfectly tempered egg base makes is undeniable. This guide will demystify the process, explaining not just how to temper eggs for your custard ice cream base, but why it’s so crucial, offering practical steps, common pitfalls to avoid, and expert tips for achieving creamy perfection every time. Get ready to elevate your homemade ice cream game!
Understanding Tempering: The Science Behind the Silky Smoothness
At its core, tempering is a culinary technique designed to gently raise the temperature of a delicate ingredient, like eggs, before fully incorporating it into a much hotter mixture. Think of it as a controlled thermal acclimatization process. For custard ice cream, the goal is to integrate cold egg yolks into a hot dairy mixture (milk and cream) without them curdling or scrambling.
Why is this slow and steady approach so vital? Eggs are primarily composed of proteins. When these proteins are exposed to sudden, intense heat, they rapidly coagulate, tightening up into firm clumps – essentially, scrambled eggs. While delicious in an omelet, scrambled egg bits are far from desirable in a smooth ice cream. Tempering works by gradually diluting these egg proteins with small additions of hot liquid while whisking constantly. This slow heating allows the proteins to unravel and form a stable, emulsified network with the dairy, rather than clumping together. The result is a thickened, silky smooth custard base that is the hallmark of premium ice cream. Beyond texture, egg yolks also contribute a rich mouthfeel and help to intensify the flavors in your ice cream.
Essential Tools and Ingredients for Perfect Tempering
Before you begin, gather your equipment and ingredients. Having everything ready will make the tempering process smoother and less stressful.
Key Tools:
- Whisk: A sturdy balloon whisk is essential for vigorous and continuous mixing.
- Heatproof Bowls: You’ll need at least two: one large bowl for your egg mixture and another (or the saucepan itself) for cooling. Glass or stainless steel bowls are ideal.
- Heavy-Bottomed Saucepan: This helps distribute heat evenly and prevents scorching the dairy base.
- Ladle: For slowly transferring hot liquid to the eggs.
- Fine-Mesh Sieve: Absolutely crucial for straining out any small lumps or overcooked egg bits, ensuring a perfectly smooth custard.
- Instant-Read Thermometer (Recommended): While not strictly required if you know what to look for, a thermometer provides accuracy for both heating the dairy and cooking the custard, ensuring optimal texture and food safety.
- Damp Kitchen Towel: Place this under your mixing bowl to keep it stable while you whisk, freeing up both hands.
|
Our Picks for the Best Ice cream maker in 2026
As an Amazon Associate I earn from qualifying purchases.
|
||
| Num | Product | Action |
|---|---|---|
| 1 | Cuisinart Ice Cream Maker Machine, 2-Quart Stainless Steel Frozen Yogurt, Gelato, Sorbet, Ready in 20 Minutes, LCD Screen and Timer, ICE-70P1 |

|
| 2 | Cuisinart Ice Cream Maker Machine, 2-Quart Ice Cream, Sorbet and Frozen Yogurt Machine, Fully Automatic Double-Insulated Freezer Bowl Makes Frozen Desserts in Under 30 Minutes, ICE30BCP1, Silver |
|
| 3 | Ninja NC301 CREAMi Ice Cream Maker, for Gelato, Mix-ins, Milkshakes, Sorbet, Smoothie Bowls & More, 7 One-Touch Programs, with (2) Pint Containers & Lids, Compact Size, Perfect for Kids, Silver |
|
| 4 | Ice Cream Maker Attachment for KitchenAid, Fits KitchenAid 4.5/5QT & 6QT Mixers, Frozen Ice Cream & Sorbet Gelato Maker, 2 Quart, White |
|
| 5 | Ninja CREAMi Scoop & Swirl Ice Cream Maker, Soft Serve Desserts, Sorbet, Milkshakes, Frozen Yogurt and More, 13-in-1 Programs, Includes Handle and Two 16 oz 2-in-1 Pints, NC701 |
|
| 6 | Dash My Mug Ice Cream Maker - Makes Single Serving of Gelato, Frozen Yogurt, Sorbet & More - Easy to Clean & Use - Aqua, 2 Bowls |
|
| 7 | Nostalgia Electric Ice Cream Maker - Old Fashioned Soft Serve Ice Cream Machine Makes Frozen Yogurt or Gelato in Minutes - Fun Kitchen Appliance - Blue - 4 Quart |
|
| 8 | Nostalgia Electric Ice Cream Maker With 4 Qt Capacity- Old Fashioned Ice Cream Machine Makes Frozen Yogurt or Gelato in Minutes- Vintage Wooden Style Ice Cream Maker with Aluminum Canister- Light Wood |
|
| 9 | Elite Gourmet 4Qt Electric Ice Cream Maker EIM350 Delicious Homemade Ice Cream, Gelato, Sorbet, Frozen Yogurt, 4Qt Aluminum Freezing Cannister, Durable Plastic Ice Bucket, Powerful 50W, Periwinkle |
|
| 10 | Cuisinart Ice Cream Maker, 1.5 Quart Double Insulated, Sorbet and Frozen Yogurt Maker, Ready in 20 Minutes, ICE-21P1, White |
|
Basic Custard Ingredients:
- Egg Yolks: The star of the show, providing richness and thickening power.
- Heavy Cream & Whole Milk: The dairy base for your ice cream. A combination often yields the best balance of richness and flavor.
- Granulated Sugar: Sweetens the base and also helps stabilize the egg proteins.
- Pinch of Salt: Balances the sweetness and enhances flavor.
- Flavorings: Vanilla bean, extracts, cocoa powder, etc., to be added at appropriate stages.
Step-by-Step Guide: How to Temper Eggs for Your Ice Cream Base
Follow these steps carefully to ensure a perfectly smooth and rich custard base for your homemade ice cream.
1. Prepare Your Egg and Dairy Mixtures
In a large, heatproof bowl, whisk your egg yolks with half of the granulated sugar until the mixture is smooth and pale yellow. Set aside. In a heavy-bottomed saucepan, combine the heavy cream, whole milk, and the remaining sugar. Place the saucepan over medium heat and bring the mixture to a gentle simmer, just until it’s steamy and small bubbles form around the edges, but do not let it boil. Aim for a temperature between 170°F and 180°F (76°C-82°C) if using a thermometer.
2. The Gradual Introduction (Tempering)
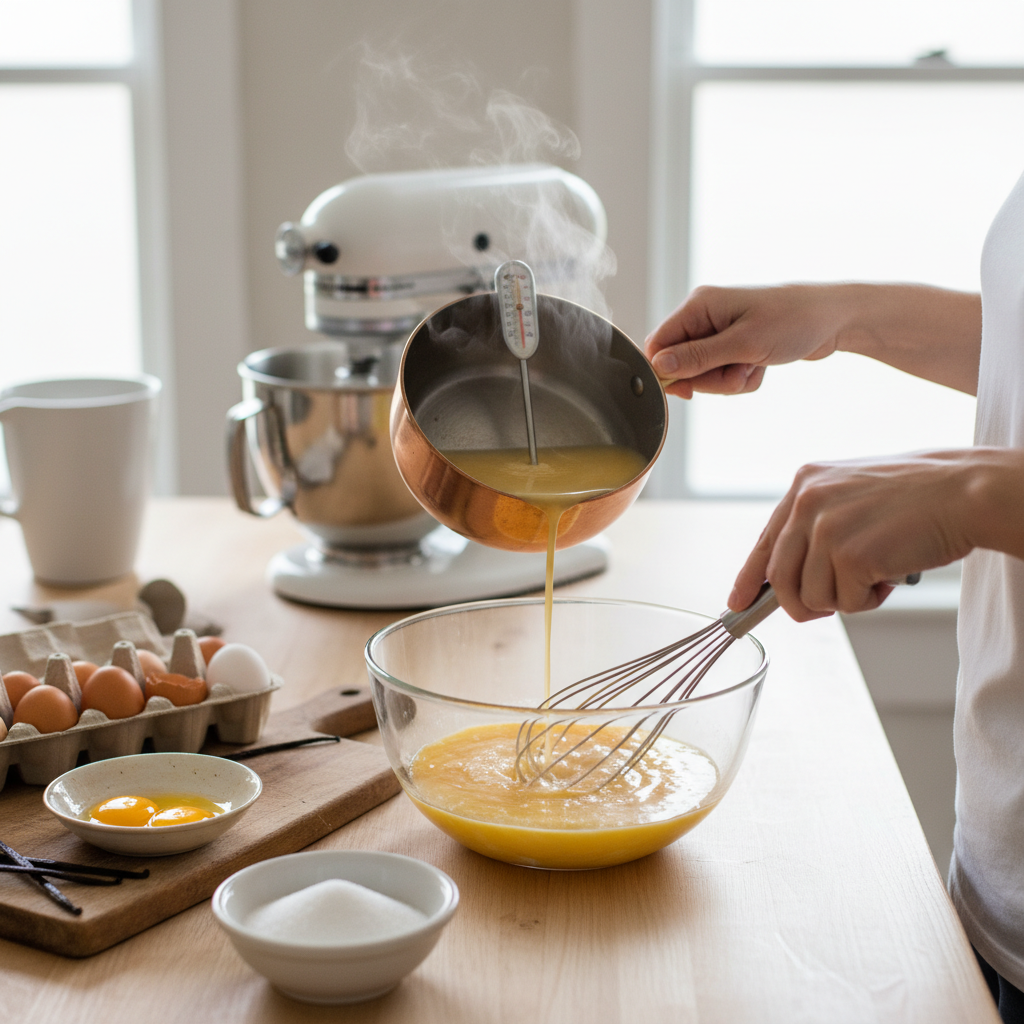
This is the most critical step. Place your bowl of whisked eggs on a damp kitchen towel to prevent it from sliding. While continuously and vigorously whisking the egg mixture with one hand, slowly drizzle a small amount (about half a cup or one ladleful) of the hot dairy into the eggs with your other hand. The constant whisking is key here, as it gradually warms the eggs and prevents them from scrambling. Continue to slowly add more hot dairy, a ladleful at a time, whisking constantly, until you’ve incorporated about half of the total hot liquid. At this point, the egg mixture should be significantly warmer to the touch.
3. Combine and Cook the Custard
Once the eggs are tempered, slowly pour the entire warmed egg mixture back into the saucepan with the remaining hot dairy. Return the saucepan to medium-low heat. Continue to cook the custard, stirring constantly with a wooden spoon or spatula, scraping the bottom and sides of the pot to prevent sticking and scorching. The custard is ready when it thickens slightly and coats the back of a spoon. If you run your finger across the back of the spoon, it should leave a distinct line. Using a thermometer, the target temperature is typically between 175°F and 180°F (79°C-82°C). Never allow the custard to boil, as this will cause the eggs to curdle immediately.
4. Strain for Perfection
Immediately remove the custard from the heat and pour it through a fine-mesh sieve into a clean, heatproof bowl. This crucial step catches any small lumps of cooked egg or impurities, ensuring your ice cream base is impeccably smooth.
5. Chill Rapidly
To stop the cooking process and prepare for churning, place the bowl of strained custard over an ice bath (a larger bowl filled with ice and a little water). Stir occasionally until the custard is cool, then cover it and transfer it to the refrigerator. For the best results, chill the custard thoroughly for at least 4 hours, or preferably overnight. A well-chilled base churns more efficiently and results in a creamier ice cream.
Common Mistakes and How to Avoid Them
Even seasoned cooks can stumble when tempering. Here are the most frequent missteps and how to sidestep them:
- Adding Hot Liquid Too Quickly: This is the express route to scrambled eggs. Always pour in a slow, steady stream while whisking.
- Insufficient Whisking: If you don’t whisk constantly, especially during the initial tempering and while cooking the custard, hot spots can form, leading to curdling.
- Overheating the Custard: Boiling the custard base will quickly curdle the eggs. Keep the heat at medium-low and monitor the temperature carefully, removing it from the heat as soon as it coats the spoon or reaches the target temperature.
- Skipping the Strainer: Even with perfect technique, a few tiny lumps can sometimes form. Straining is your insurance policy for a truly silky texture.
- Not Chilling Long Enough: An insufficiently chilled base won’t churn properly, leading to icy ice cream. Patience is a virtue here!
Expert Tips for Tempering Success
“Tempering is all about patience and presence. Don’t rush, keep whisking, and trust your instincts – and a good thermometer!” – Chef Christina, Edible Times
- Prep Everything First: Read your recipe, measure ingredients, and set out all your tools before you start heating anything.
- Stabilize Your Bowl: A damp kitchen towel under your egg bowl is a simple yet effective trick that frees up both your hands for pouring and whisking.
- Room Temperature Eggs (Optional): While not strictly necessary if you temper correctly, some find that bringing eggs to room temperature slightly reduces the thermal shock.
- The “No-Fuss” Alternative: For those truly nervous about traditional tempering, some modern recipes suggest a “no-fuss” method. This involves combining all cold ingredients (eggs, sugar, milk/cream) from the start and heating them very slowly over low heat, whisking constantly, until the custard thickens to the desired consistency (175-180°F). The continuous whisking from the outset helps prevent the eggs from scrambling. While effective, traditional tempering is often preferred when infusing dairy with aromatics that require pre-heating.
When Tempering Isn’t Strictly Necessary (and When It Is)
While tempering is the gold standard for many custard bases, there are scenarios where it might be adapted or even skipped. If your recipe involves pre-heating the dairy to infuse flavors (like vanilla bean or spices), then traditional tempering is essential because you’re starting with a hot liquid that must be carefully introduced to the eggs.
However, if a recipe calls for combining all cold ingredients and then gradually heating them together while continuously whisking, this “no-fuss” approach can also yield a smooth custard. The key distinction is whether you begin with a pre-heated liquid or start everything cold and heat it slowly as a combined mixture. Always check your specific recipe’s instructions and choose the method you are most comfortable with.
Conclusion
Tempering eggs for a custard-based ice cream is a skill that truly transforms your homemade frozen treats from good to truly exceptional. By understanding the science behind why we temper – preventing scrambled eggs and creating a stable, emulsified base – and following the step-by-step process with patience and attention to detail, you’ll consistently achieve that coveted silky, rich texture. Don’t let the initial apprehension deter you; with a little practice, tempering will become a natural and rewarding part of your ice cream-making repertoire.
So, roll up your sleeves, embrace the whisk, and get ready to enjoy the incredible difference a perfectly tempered custard base makes. What delicious flavor will you churn out first with your newfound tempering prowess?
Frequently Asked Questions
What temperature should my custard reach when cooking?
Your custard base should ideally reach a temperature between 175°F and 180°F (79°C-82°C) while stirring continuously. This temperature is hot enough to thicken the eggs and ensure food safety, but not so hot that the eggs will curdle.
Can I use whole eggs instead of just yolks for ice cream custard?
While some recipes might incorporate a whole egg, traditional rich, dense custard ice cream primarily uses only egg yolks. Yolks provide more fat and emulsifying power, which contributes to the signature creamy texture and prevents iciness. Using whole eggs can result in a lighter, less rich texture.
What if my custard curdles slightly?
If your custard curdles slightly, immediately remove it from the heat and pour it through a fine-mesh sieve. This will catch any small cooked bits, leaving you with a smoother, though perhaps not perfectly uniform, base. For severe curdling where eggs have fully scrambled, it’s often best to start over.
How long does the custard base need to chill before churning?
For optimal results, your custard base should be thoroughly chilled in the refrigerator for at least 4 hours, but preferably overnight (8-12 hours). A very cold base churns more efficiently, yielding a creamier texture and better volume for your ice cream.